

Creating a piece of artwork might seem daunting, but it can be fun and a good release of pent up energy and frustration if you allow yourself a bit of leeway in experimenting. Especially with ideas that maybe appeal to you, but you have never tried the technique.
 If you are like me, you are limited on time, patience and money, so I don't get to try out a lot of different techniques. I tend to stick with the tried and true, but every now and then I'll splurge and buy art supply items, and enjoy them tremendously.
I've found a technique that is tremendously inexpensive, though you can use high priced materials, the most expensive frames, the most expensive everything... and maybe it will turn out more amazing... but probably not.
 This is a pour-able project, BUT! Don't get turned off by that name. It is pour-able, but it is not one of those projects that wastes a lot of paint. We are going to use a piece of cardstock or two to catch the drips and splatters, and then we'll use that in another project!
This is a fun project, since it is going to turn out how it wants to turn out. You can control a bit of the results, but just a bit. So lets get started and you will see how much fun this is!
1. Assemble the materials.
There is a shopping list under the page "Shopping Lists" on the ribbon above, under the title of the blog. This list is pretty self explanatory, it falls under October 3, 2017~ Art Project.

2. Use plastic table cover to completely cover your work surface, you may want to wear rubber gloves and old clothing/shoes. This is a messy project, but it can be containable.
3. Assemble the cups in a manner that your canvas will sit on top of them, holding it above the work surface. I like to set up the cups away from my work table, so that I can work on another painting, kind of assembly line type work... which, by the way, can be fun to have help with this. It is amazing to watch the paint, and kids love helping.
4. Assemble the containers you will use for the separate colors of paint. Depends on how many colors you use for number of containers. I use the little cups we get with salsa at Taco Villa. I like the size, but... and this is a big, but... these do not hold a lot of paint. So, either you will have to mix several times if you end up wanting to do more paintings, or... you can use a bathroom cup, which is a bit bigger, probably 4oz. I have also used plastic cups, cut down, to mix. Open paints, but keep lid on them. The little round seal needs to be taken off and discarded.
5. Assemble the paint you will use. I use 6 or 7 colors when I am working, but even 3 makes a cool effect. The more contrast you have the better. I like to work with white, black, bright colors like turquoise, hot pink, orange, lime green. You can experiment, see which colors you like best.
6. Open the container of PVA, it is easier to pour without the adjustable lid.
7. There needs to be a cup of water handy for washing brushes, also clean water for mixing. A bottle with a small nozzle will help drip the water a bit at a time.
 ................................................................................
First things first~
I cover part of the canvas with acrylic paint, since this allows the paint you are going to pour onto the canvas to move better. You can forego this step, it just seems to me that the paint flows better with the addition of the layer of paint. No need to let this dry.
Second step~
Add paint to the containers. Use two-three tablespoons of paint for each container, if you have one color you want to be predominant, use double that amount.
Pour the same amount of the PVA glue (white school glue) as paint into the container stir together, only add water to have a pour-able consistency, maybe a drop or two at a time.

 Stir the paint/glue mixture to combine carefully, but do not create air bubbles. A few aren't going to hurt. I use either a chopstick or a Popsicle stick to stir, a straw works fine. You want the paint to be the consistency of heavy cream, or basically that it will drip with ease from the stick but it still coats it.
Continue with each color of paint to be used. Mix equal amounts of paint to glue, adding the least amount of water to get the right consistency.
Once finished with mixing, there are two ways to get the paint on the canvas. The first way is to do a pouring from a single cup, which is nice, but you have less control. I tried this, like the results, but it is easy for the paint to become muddy and lose it's definition, but I'll show you how it's done. Later on, I'll show you my way of creating the same project, just with a different technique.


I cut down a plastic drinking cup, you can use a full size, but I prefer shorter. Less space for the paint to move, less mixing of paint, less wasted paint.
Start pouring the paint into the prepared cup. I start with the base color, or the color you
 would like to define the most.

 After pouring the second color, I added a squirt (short burst) of the spray lubricant. This is something that goes against everything that I think when using acrylic paint, but this helps make some of the cool effects that we will see in the painting. Just a spritz does the job.
DO NOT MIX!
You should end up with something that looks like this
⇐
You continue to add the colors you have pre-mixed, with a short spray of the lubricant after each addition.

 Once you are sure about the additions, you will hold your breath and turn the cup full of paint upside down onto the canvas. Allow it to rest there for just a few seconds to allow the paint to settle a bit, then take the cup off.
 Now is when the creating of the textured look happens! Slowly move the canvas up and down, side to side, tilting it so that the paint can spread across the whole canvas. Allow the paint to start to move over the edge onto the sides.
 At first you do not see the areas of paint making anything but swirls, but, once you allow it to rest, you will see areas of texture starting to appear.

 When you have your picture at a point that you like it, set it on top of the already assembled cups so that it can drain without sticking to any surface. Since there is still some extra paint, you will want to have something underneath to catch the drips. I use a piece of card stock so that I can add to and use it for other projects
You may need to encourage some of the paint to continue over the edges, usually it will continue to move after it has been allowed to rest.
 The texturing can be seen in this picture, I love the way it looks almost like alligator skin in places.
**** When the cardstock I used to catch drips was dry, I put it away to use for another project. I'll pull it out tomorrow to show you what I did with it!****
After the piece has dried, don't forget to add your signature somewhere on the piece! You can also use this as a background for a painting, go wild, see what you can create! Later in the month, I will use this technique for a background of a painting, which I am excited about making!
It is this simple to have a modern piece of art for your walls! Create them to match or contrast your decor. Friends will want one, so mix up a lot of paint and pour 'till your heart's content!
Happy painting :)


 If you are like me, you are limited on time, patience and money, so I don't get to try out a lot of different techniques. I tend to stick with the tried and true, but every now and then I'll splurge and buy art supply items, and enjoy them tremendously.
I've found a technique that is tremendously inexpensive, though you can use high priced materials, the most expensive frames, the most expensive everything... and maybe it will turn out more amazing... but probably not.

This is a fun project, since it is going to turn out how it wants to turn out. You can control a bit of the results, but just a bit. So lets get started and you will see how much fun this is!
1. Assemble the materials.
There is a shopping list under the page "Shopping Lists" on the ribbon above, under the title of the blog. This list is pretty self explanatory, it falls under October 3, 2017~ Art Project.

2. Use plastic table cover to completely cover your work surface, you may want to wear rubber gloves and old clothing/shoes. This is a messy project, but it can be containable.
3. Assemble the cups in a manner that your canvas will sit on top of them, holding it above the work surface. I like to set up the cups away from my work table, so that I can work on another painting, kind of assembly line type work... which, by the way, can be fun to have help with this. It is amazing to watch the paint, and kids love helping.
4. Assemble the containers you will use for the separate colors of paint. Depends on how many colors you use for number of containers. I use the little cups we get with salsa at Taco Villa. I like the size, but... and this is a big, but... these do not hold a lot of paint. So, either you will have to mix several times if you end up wanting to do more paintings, or... you can use a bathroom cup, which is a bit bigger, probably 4oz. I have also used plastic cups, cut down, to mix. Open paints, but keep lid on them. The little round seal needs to be taken off and discarded.
5. Assemble the paint you will use. I use 6 or 7 colors when I am working, but even 3 makes a cool effect. The more contrast you have the better. I like to work with white, black, bright colors like turquoise, hot pink, orange, lime green. You can experiment, see which colors you like best.
6. Open the container of PVA, it is easier to pour without the adjustable lid.
7. There needs to be a cup of water handy for washing brushes, also clean water for mixing. A bottle with a small nozzle will help drip the water a bit at a time.
 ................................................................................
First things first~
I cover part of the canvas with acrylic paint, since this allows the paint you are going to pour onto the canvas to move better. You can forego this step, it just seems to me that the paint flows better with the addition of the layer of paint. No need to let this dry.
Second step~
Add paint to the containers. Use two-three tablespoons of paint for each container, if you have one color you want to be predominant, use double that amount.
 |
| equal amounts acrylic paint and PVA glue |
 |
| water in bottle with small nozzle for drops |

 Stir the paint/glue mixture to combine carefully, but do not create air bubbles. A few aren't going to hurt. I use either a chopstick or a Popsicle stick to stir, a straw works fine. You want the paint to be the consistency of heavy cream, or basically that it will drip with ease from the stick but it still coats it.
Continue with each color of paint to be used. Mix equal amounts of paint to glue, adding the least amount of water to get the right consistency.
Once finished with mixing, there are two ways to get the paint on the canvas. The first way is to do a pouring from a single cup, which is nice, but you have less control. I tried this, like the results, but it is easy for the paint to become muddy and lose it's definition, but I'll show you how it's done. Later on, I'll show you my way of creating the same project, just with a different technique.


I cut down a plastic drinking cup, you can use a full size, but I prefer shorter. Less space for the paint to move, less mixing of paint, less wasted paint.
Start pouring the paint into the prepared cup. I start with the base color, or the color you
 would like to define the most.
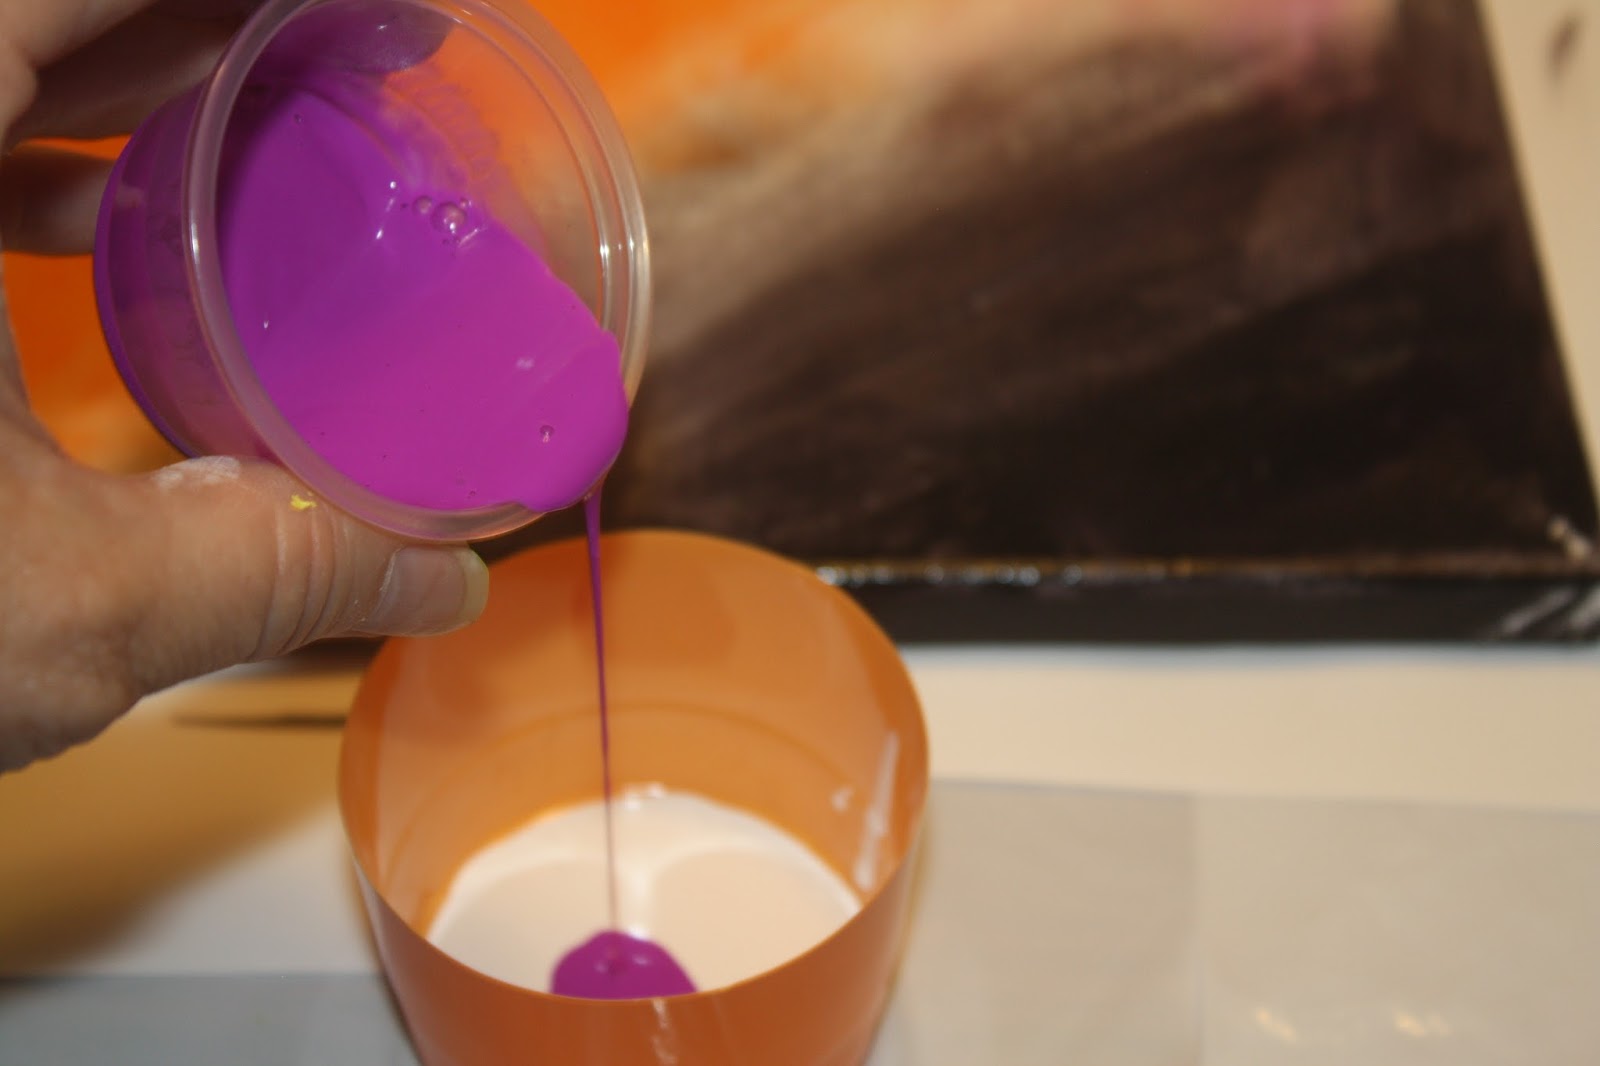
 After pouring the second color, I added a squirt (short burst) of the spray lubricant. This is something that goes against everything that I think when using acrylic paint, but this helps make some of the cool effects that we will see in the painting. Just a spritz does the job.
DO NOT MIX!
 |
| should look similar to this |
⇐
You continue to add the colors you have pre-mixed, with a short spray of the lubricant after each addition.

 Once you are sure about the additions, you will hold your breath and turn the cup full of paint upside down onto the canvas. Allow it to rest there for just a few seconds to allow the paint to settle a bit, then take the cup off.
 Now is when the creating of the textured look happens! Slowly move the canvas up and down, side to side, tilting it so that the paint can spread across the whole canvas. Allow the paint to start to move over the edge onto the sides.
 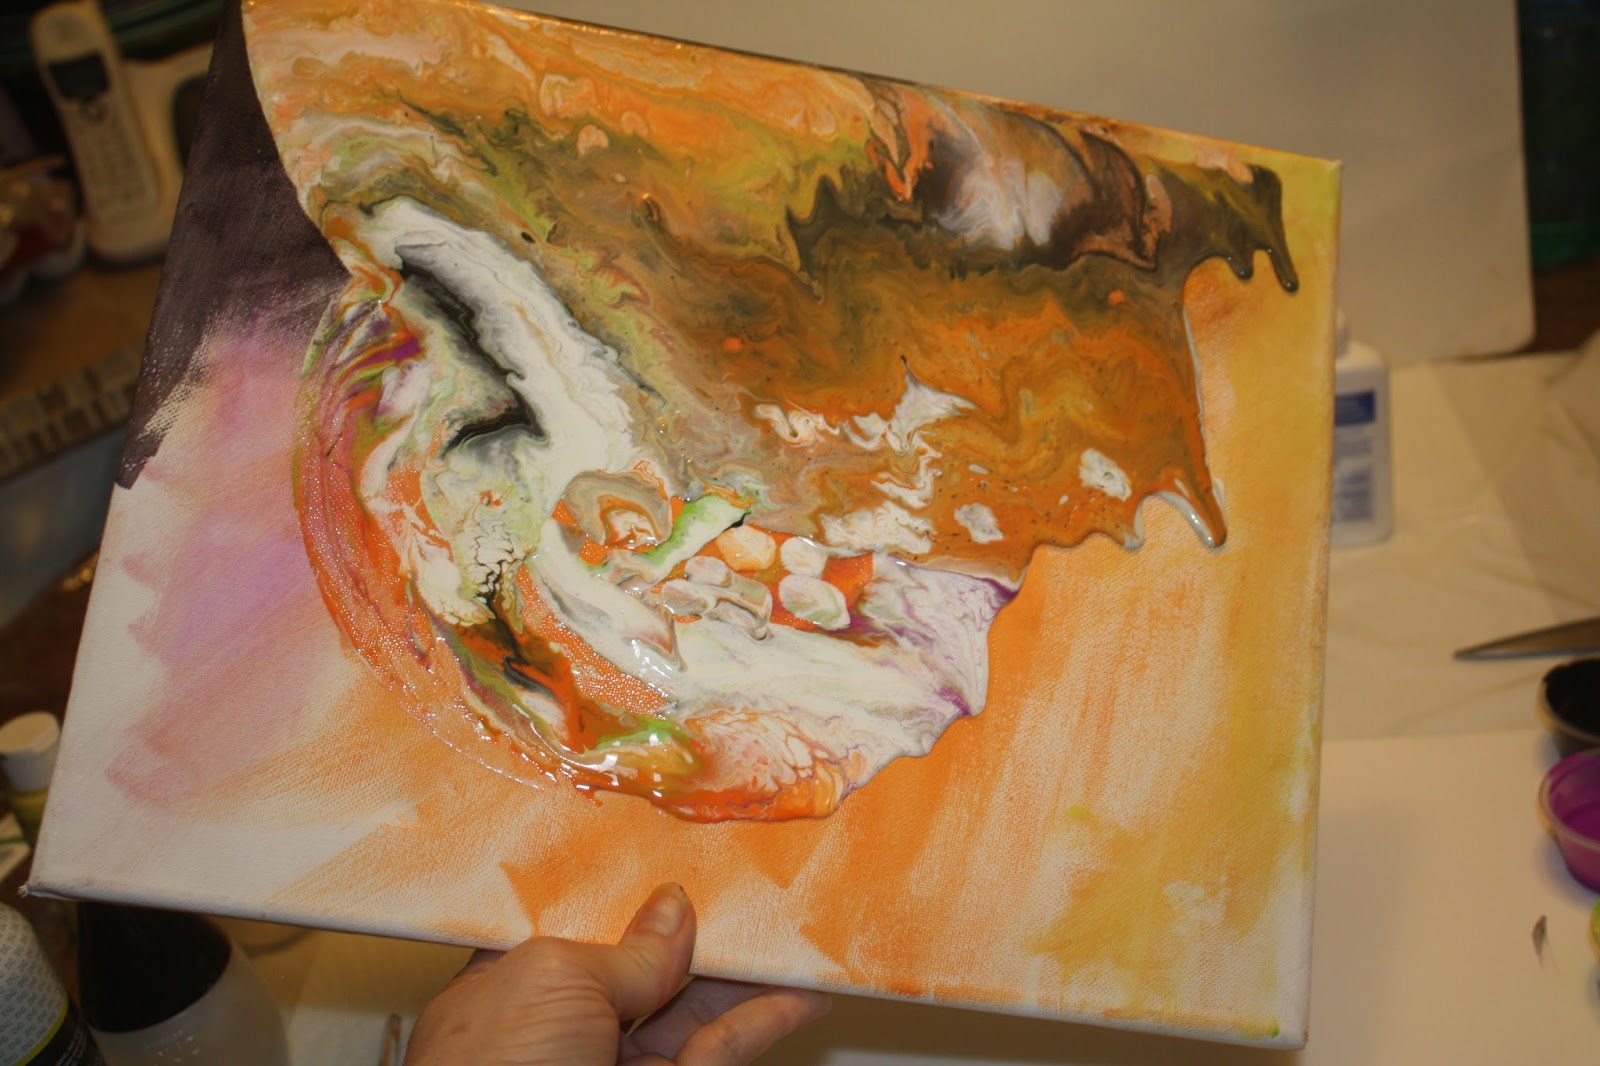 At first you do not see the areas of paint making anything but swirls, but, once you allow it to rest, you will see areas of texture starting to appear.
 When you have your picture at a point that you like it, set it on top of the already assembled cups so that it can drain without sticking to any surface. Since there is still some extra paint, you will want to have something underneath to catch the drips. I use a piece of card stock so that I can add to and use it for other projects
You may need to encourage some of the paint to continue over the edges, usually it will continue to move after it has been allowed to rest.
 The texturing can be seen in this picture, I love the way it looks almost like alligator skin in places.
**** When the cardstock I used to catch drips was dry, I put it away to use for another project. I'll pull it out tomorrow to show you what I did with it!****
After the piece has dried, don't forget to add your signature somewhere on the piece! You can also use this as a background for a painting, go wild, see what you can create! Later in the month, I will use this technique for a background of a painting, which I am excited about making!
It is this simple to have a modern piece of art for your walls! Create them to match or contrast your decor. Friends will want one, so mix up a lot of paint and pour 'till your heart's content!
Happy painting :)
No comments:
Post a Comment