

Wow! Tamales!

I love, love, LOVE! Tamales! When I was a kid, I loved going to my maternal grandparents house because we would inevitably have one meal comprised of tamales, probably beans, salad, and whatever came out of the garden.
I didn't make tamales until I was grown, I helped make them over the years, but never ventured into making on my own until I had craved good homemade tamales so much that I couldn't stand it! My first batch wasn't bad. The second was better... and now I'm a pro!
Don't let me fool you, this is a meal that you do not take on lightly. It can be a whole day affair or some people break it into two days, cooking the meat the first day and the rest the second day. I like to get it done in one. So, start early, put the meat on to cook.

Start soaking the husks early, even overnight to make sure they are very pliable.
Tamales go back to days gone by when portable fare was needed for battles, filling cornmeal with meat or vegetables and wrapping it into little packages caught on quickly!
The names for the tamal are varied, though not as much as the fillings. In Nicaragua they are called Nacatamal, in Veracruz. Mexico, they are called Zacahull. in Cuba, most of Mexico and most of Central America, they are called tamal. Venezuela calls them Hallaca while Columbia calls them Bollo, but in Ecuador and Bolivia, they are known as Humita. Guatemala have two names for these delectible treats, Paches and Chuchitos. There's Zacahuil, made in the Huasteca region of Mexico and large tamales that are known as "pibs" in the Yucatán Peninsula.
There are other names, and I am sure colloquial terms for the delicious food, but for now, just know that they are revered, and have been for centuries. The first knowledge we have of them goes back to at least the time when the Mural of San Bartolo, in Petén, Guatemala was created around 100AD. But there is evidence that Pre-Columbians ate tamales and even had a festival in honor of them (Atamalcualiztli ). Depictions of tamales are in Aztec and Myan (200-1000 CE) hieroglyphs that depict different types of ingredients for the tamales, including rabbit, deer, fish, iguana, bee, ant (I'm thinking they may have mistaken this one, some ancient Aztec dude was depicting a picnic that ants had invaded, as ants will do)... turkey, frog and flamingo... There were many other vaireties of meats and vegetables, including bean, squash, pumpkin chocolate, fruit... The means to wrap the tamal is varied as well, different types of leaves, such as banana and plantain, or they could have been wrapped in the corn husk, or even in cloth. The tamal is cooked in the wrapper over steam, but they are thought to have originally been buried in the ashes of a fire to cook, or on a griddle to heat, maybe even boiled.
This recipe yields about 3 dozen-5 1/2 inch tamales
Step 1. The Meat
**** After the meat cooks, you will add:
 Cube the chicken int 1 1/2" cubes, Heat a large, 6 quart pan with heavy lid, when very hot, throw the chicken in the
pot. Allow it to set for a few minutes to get browned then turn over and brown all sides if possible.
 Add the onions and garlic cloves. I am not terribly worried about getting all the peel off the garlic, just throw it in whole. Stir to make sure all sides of the cubed chicken are browned. When it is apparent that the chicken is nice and browned, add the spices to the mix. The chopped
pepper, the comino and the chili powder ( on the chili powder, you should be able to taste a bit and it not be bitter or taste odd. If it is not good plain, it will not be good in your dish). At this point, add water to top of meat, then bring to boil.

 Turn down heat, cover with heavy lid and cook on medium for 3 hours or until the meat is tender
enough to shred apart, adding water if needed. When the meat is very
tender and shredable, drain the broth off the meat
Turn down heat, cover with heavy lid and cook on medium for 3 hours or until the meat is tender
enough to shred apart, adding water if needed. When the meat is very
tender and shredable, drain the broth off the meat
 **SAVE the broth*** and shred the meat, mashing the garlic and onions if they are still whole. Add the hot sauce at this point, more or less depending on dryness of the meat. I use about a cup, sometimes I add back a couple of tablespoons of broth to the meat to make sure it is not too dry.


While you are cooking the meat, you can soak the husks, but they are better if you soak overnight.You want them to be pliable enough that you can fill them and wrap them
without resistance. They should be very pliable. I place the husks in a large pan and pour very hot water over the husks, weighting them down with a plate or heavy bowl.
Step 2: The Masa
 alternating with the warm broth. using bread hook if using a stand mixer, knead the dough for a few minutes. If you are mixing by hand, you will need to use a sturdy wooden spoon to stir the mixture until very well blended and sticky but smooth.

Step 3: Filling and wrapping
Having your ingredients close at hand is important, it is easier to be able to do all the steps in an orderly fashion, but... if you have the whole family join in, it is much more fun! One person can lay the masa mixture onto the husk, another fill, another to wrap. This makes for great memories and lots of laughs. Expect the kitchen to get a bit messy, these are fast to wrap, but at times it can get a little sloppy.
 Pour the water off the corn husks, clean off any of the silk, I pat them dry a bit, but cover with damp cloth.
Use a couple of tablespoons of the Masa mixture to lay on a husk, spread evenly over the husk, not too thick, maybe an eighth to a quarter of an inch thick.

Use 1-2 tablespoons of shredded meat mixture and spread down the center of the masa, length ways.
 Begin wrapping the husk over the meat mixture, putting the sides together to join and making sure that joint is covered. Fold up the end, if needed, use a thin strip of one of the husks as a tie for the tamal.
 I usually don't worry about tying them together.
 I've found that the tamales will stay folded just fine, but if you want, you can use the strip of husk or kitchen string to tie them up in a little bundle.

 Wrap all of the tamales at once, because if you start loading them into the pot, you will find that you will just give up and cook what you have! Seriously, it is just easier to finish wrapping everything first, then try to fit them into the pot. Usually you can squeeze any and all into one large kettle.
Depending on what you use, if you have a basket to steam, you will tilt it at a 45º angle. Lay the tamales on the side where you wrapped them, with the fold at the bottom of the tamales towards the bottom side of the basket. Pack them in as tight as possible. Lower the basket into an inch or so of boiling water to steam...

 For me, I use a flat tray instead of the steamer basket in the bottom of the kettle. Sometimes I add a cone made out of aluminum foil that I lay the tamales against but usually make enough to fill a whole kettle. Lay them as upright as possible. I tip the kettle to 45 degree angle, lay the tamales with the fold and seam side down, and fill the pot!
 Steam for 45 minutes to an hour. When done, I turn off the heat and let stand for about 10 minutes, to let them cool down a bit. They aren't that cool, so use care when removing. If you have the steamer basket, lift out carefully, allow to drain off excess water on kitchen towel or paper towels on a plate. Use tongs to remove and lay in a large, shallow bowl or on a large platter.

If you use a plate or a steamer tray with aluminum foil cone to steam, allow the tamales to cool a bit, use tongs to remove, I lay a couple of layers of paper toweling into a large, shallow bowl, layering until it is filled.
Serve warm.
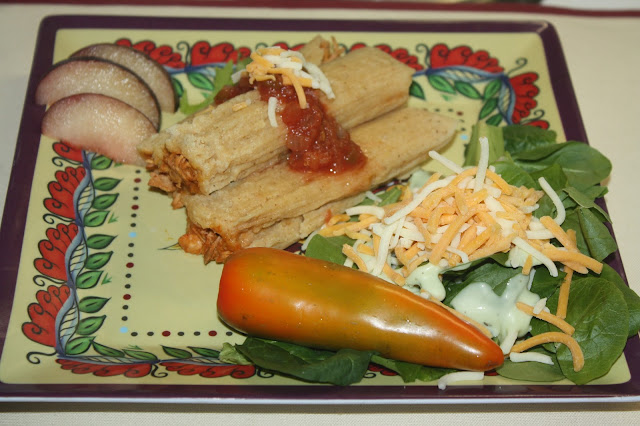 Some people like these served with chili and shredded colby cheese. I like green sauce on them, made from tomatillos, jalapeños, cilantro and a bit of lime. These can be served with rice and beans and a nice green salad with croutons of crushed corn tortillas.
This is a cool site! Food timeline

I love, love, LOVE! Tamales! When I was a kid, I loved going to my maternal grandparents house because we would inevitably have one meal comprised of tamales, probably beans, salad, and whatever came out of the garden.
I didn't make tamales until I was grown, I helped make them over the years, but never ventured into making on my own until I had craved good homemade tamales so much that I couldn't stand it! My first batch wasn't bad. The second was better... and now I'm a pro!
Don't let me fool you, this is a meal that you do not take on lightly. It can be a whole day affair or some people break it into two days, cooking the meat the first day and the rest the second day. I like to get it done in one. So, start early, put the meat on to cook.

Start soaking the husks early, even overnight to make sure they are very pliable.
Tamales go back to days gone by when portable fare was needed for battles, filling cornmeal with meat or vegetables and wrapping it into little packages caught on quickly!
The names for the tamal are varied, though not as much as the fillings. In Nicaragua they are called Nacatamal, in Veracruz. Mexico, they are called Zacahull. in Cuba, most of Mexico and most of Central America, they are called tamal. Venezuela calls them Hallaca while Columbia calls them Bollo, but in Ecuador and Bolivia, they are known as Humita. Guatemala have two names for these delectible treats, Paches and Chuchitos. There's Zacahuil, made in the Huasteca region of Mexico and large tamales that are known as "pibs" in the Yucatán Peninsula.
There are other names, and I am sure colloquial terms for the delicious food, but for now, just know that they are revered, and have been for centuries. The first knowledge we have of them goes back to at least the time when the Mural of San Bartolo, in Petén, Guatemala was created around 100AD. But there is evidence that Pre-Columbians ate tamales and even had a festival in honor of them (Atamalcualiztli ). Depictions of tamales are in Aztec and Myan (200-1000 CE) hieroglyphs that depict different types of ingredients for the tamales, including rabbit, deer, fish, iguana, bee, ant (I'm thinking they may have mistaken this one, some ancient Aztec dude was depicting a picnic that ants had invaded, as ants will do)... turkey, frog and flamingo... There were many other vaireties of meats and vegetables, including bean, squash, pumpkin chocolate, fruit... The means to wrap the tamal is varied as well, different types of leaves, such as banana and plantain, or they could have been wrapped in the corn husk, or even in cloth. The tamal is cooked in the wrapper over steam, but they are thought to have originally been buried in the ashes of a fire to cook, or on a griddle to heat, maybe even boiled.
This recipe yields about 3 dozen-5 1/2 inch tamales
Step 1. The Meat
- 3 1/2 pounds of chicken breast. If you prefer, you can use pork, or half and half.
- 1 tbsp ground chili pepper
- 1 tsp. ground cumino (Cumin)
 |
| cube the chicken breasts |
- 1 onion cut into 1" strips
- 3 garlic cloves.
- 1/2 tsp. cayenne pepper4 cups hot water
- 1 dried Pasilla pepper, chopped finely (you can remove the stem and throw it in the blender to achieve the finely chopped part)
 |
| Ground Comino |
- 1 cup Hot Sauce. I like Valentina NOT Picante sauce, though it is called salsa picante, it is smooth not chunky.
 Cube the chicken int 1 1/2" cubes, Heat a large, 6 quart pan with heavy lid, when very hot, throw the chicken in the
  |
| Stir to brown as much as possible |
 Add the onions and garlic cloves. I am not terribly worried about getting all the peel off the garlic, just throw it in whole. Stir to make sure all sides of the cubed chicken are browned. When it is apparent that the chicken is nice and browned, add the spices to the mix. The chopped
  |
| Add good spices to the meat and onions |
 |
| Hot water, don't add cold |

 Turn down heat, cover with heavy lid and cook on medium for 3 hours or until the meat is tender
enough to shred apart, adding water if needed. When the meat is very
tender and shredable, drain the broth off the meat
Turn down heat, cover with heavy lid and cook on medium for 3 hours or until the meat is tender
enough to shred apart, adding water if needed. When the meat is very
tender and shredable, drain the broth off the meat **SAVE the broth*** and shred the meat, mashing the garlic and onions if they are still whole. Add the hot sauce at this point, more or less depending on dryness of the meat. I use about a cup, sometimes I add back a couple of tablespoons of broth to the meat to make sure it is not too dry.

While you are cooking the meat, you can soak the husks, but they are better if you soak overnight.You want them to be pliable enough that you can fill them and wrap them
without resistance. They should be very pliable. I place the husks in a large pan and pour very hot water over the husks, weighting them down with a plate or heavy bowl.
Step 2: The Masa
- 4 cups Masa (tamal corn flour)
- 3 cups broth (from cooking the meat) very warm
- 2 tsp baking powder
- 2 tsp salt
- 1 1/3 cups vegetable shortening (if you left a lot of fat on the meat when you cooked it, cut this amount down and use the fat left in the broth) and traditionally, this would be lard, which makes them taste better.
- 1/2 tsp. ground comino
- 1 tsp. onion powder
- 1 tsp. chili powder
- 1 tsp. garlic powder

 |
| Vegetable Shortening after whipping and spices added. |
 alternating with the warm broth. using bread hook if using a stand mixer, knead the dough for a few minutes. If you are mixing by hand, you will need to use a sturdy wooden spoon to stir the mixture until very well blended and sticky but smooth.
Step 3: Filling and wrapping
Having your ingredients close at hand is important, it is easier to be able to do all the steps in an orderly fashion, but... if you have the whole family join in, it is much more fun! One person can lay the masa mixture onto the husk, another fill, another to wrap. This makes for great memories and lots of laughs. Expect the kitchen to get a bit messy, these are fast to wrap, but at times it can get a little sloppy.
 Pour the water off the corn husks, clean off any of the silk, I pat them dry a bit, but cover with damp cloth.
 Use a couple of tablespoons of the Masa mixture to lay on a husk, spread evenly over the husk, not too thick, maybe an eighth to a quarter of an inch thick.

Use 1-2 tablespoons of shredded meat mixture and spread down the center of the masa, length ways.


 Wrap all of the tamales at once, because if you start loading them into the pot, you will find that you will just give up and cook what you have! Seriously, it is just easier to finish wrapping everything first, then try to fit them into the pot. Usually you can squeeze any and all into one large kettle.
  |
| wire rack with foil to hold above boiling water |

 For me, I use a flat tray instead of the steamer basket in the bottom of the kettle. Sometimes I add a cone made out of aluminum foil that I lay the tamales against but usually make enough to fill a whole kettle. Lay them as upright as possible. I tip the kettle to 45 degree angle, lay the tamales with the fold and seam side down, and fill the pot!
 Steam for 45 minutes to an hour. When done, I turn off the heat and let stand for about 10 minutes, to let them cool down a bit. They aren't that cool, so use care when removing. If you have the steamer basket, lift out carefully, allow to drain off excess water on kitchen towel or paper towels on a plate. Use tongs to remove and lay in a large, shallow bowl or on a large platter.
If you use a plate or a steamer tray with aluminum foil cone to steam, allow the tamales to cool a bit, use tongs to remove, I lay a couple of layers of paper toweling into a large, shallow bowl, layering until it is filled.
Serve warm.
 Some people like these served with chili and shredded colby cheese. I like green sauce on them, made from tomatillos, jalapeños, cilantro and a bit of lime. These can be served with rice and beans and a nice green salad with croutons of crushed corn tortillas.
 This is a cool site! Food timeline
No comments:
Post a Comment